Showing posts with label Dalle de Verre. Show all posts

06 February 2012

Mosaic Process - Working With Stone

I've had a few people ask about my process for working with stone in mosaics recently.

Creating a mosaic with stone differs from other mosaic work mostly in the way that you cut the tesserae.

How I do it:

Disclaimer - I am not an expert, yet. I'm just telling you what works for me.

Most of the stone I use starts out as floor tiles. They run from 7/16" to 5/8" thick and are usually 12" x 12" in size. Sometimes I'll get the smaller ones, but there is more waste per piece with them since I trim off all the outer smooth-cut edges.

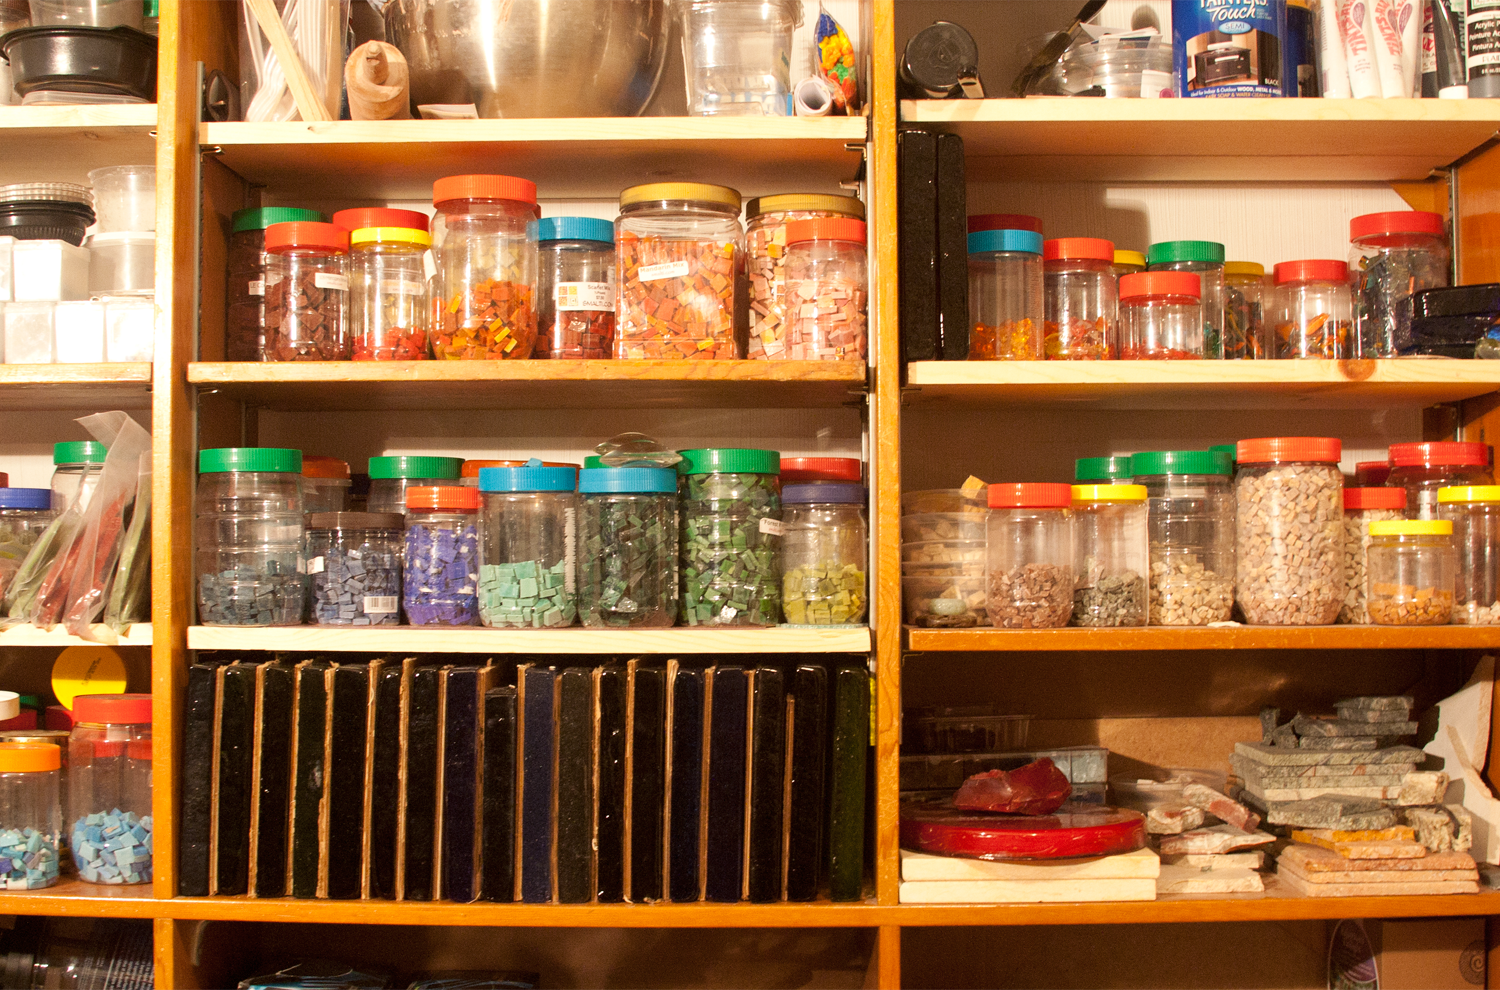
Top to bottom: 3 shelves of cut stone tesserae,
uncut stone tiles & slabs, bins of cut-up chunks

I cut the tile into manageable chunks - trying to get the chunks as rectangular as possible - with a hammer and hardie. I don't like manufactured edges to show in my mosaics, so I cut the stone to the point where the tessera has the "footprint" that I want and then I turn it sideways and cut it in half. This allows me to turn all the manufactured edges down and have only the hand-cut, irregular edges showing.

Hammers & Hardies, left - steel hammer & hardie for cutting stone,
right - carbide-tipped hamnmers and hardie for cutting glass
Stone cutting process - note the progressively smaller cuts. The two
small pieces on the top of the stack are ready for use in a mosaic.

You want to develop enough control that the force of the hammer-fall is transmitted just to the stone. There are two methods of swinging the hammer: to pivot at the elbow joint, or to pivot at the wrist. I try to isolate the pivot in my elbow joint. I find that it saves my wrist from the shock (important since I have some joint issues from earlier injuries). It also feels like I have more control and I don't fatigue so quickly.

When you're using a hammer and hardie it's important to avoid striking the hardie with the hammer as much as possible. It really dulls both the hardie and the hammer when it happens. I get the best cuts when I focus on making sure that I strike the stone exactly above where it rests on the hardie - so that the hammer tip is directly above the cutting edge of the hardie.

If I'm working with a very crumbly stone (soft limestone/sandstone) or stone that is prone to irregular cuts (heavily veined marble), I'll cut the tessarae using the hammer & hardie down to a certain size and then use my compound tile nippers or a CHEAP pair of glass tile nippers - not my Leponitts or my Montolits - to make the final cut. I have to admit that feels a bit like cheating... but I don't like wasting material and time.

I usually mix stone and glass in the mosaics. I like the rough stone and the smooth and shiny glass side-by-side. I also like the contrast between the subtle, muted colors of the stone and the more intense, pure colors of the glass.

Dalle de verre and found glass


The glass is usually dalle de verre with some smalti and the occasional weird found glass.  The dalle de verre is cut using carbide-tipped hammer and the hardie. I also use a chipping hammer to distress the surface of any larger blocks of glass and also to create shards to use in the mosaics.

Carbide-tipped hammers and hardie. Top: chipping hammer. Bottom: cutting hammer
Cutting dalles.
The carbide tips are more brittle than the steel surrounding them. It is important to always strike the glass with the hammer lined up straight with the hardie just in case you pass all the way through the glass and strike the hardie.

This is what happens when your carbide hammer strikes the hardie unevenly.
The chipping hammer isn't used with the hardie. The cut piece of dalle de verre is laid on its side and you strike it with the hammer at an angle, trying to catch just the edge of the piece of glass. This process takes off the manufactured, flat surface and creates a more visually interesting piece of glass.

The top of the smaller piece of dalle de verre has been distressed using the chipping hammer.

I use mostly Wediboard for substrate. For the stone mosaics I use the 5/8" instead of the 1/2", mainly because of the finished weight. I have a local (well, within 150 miles) supplier for the wediboard, Cole Papers in Minneapolis. They don't list wediboard on their website, but they do sell it.

I use thinset mortar to adhere the stone and glass to the Wediboard. I've been using Mapei Keraset mortar, mixed with a 1:1 mixture of water and Mapei Keraply. I'd use Laticrete products, but I can purchase the Mapei products locally.

I color the mortar with Gamblin dry pigments or Sheffield Tints-All. Lately I've been mostly using the Gamblin but I stay away from the cadmium, chromium and cobalt pigments. I don't have a safe ventilation system for using them.


15 January 2012

Catching up

A few images of recent mosaics.

These two new mosaics are going to be in a multi-artist show at LaChica Art & Music in Las Vegas in February. The show theme is nature-inspired abstracts.

Red River, 12" x 12", glass, marble, slate, coal

Inkling – the Seed of an Idea, 8" x 17", Dalle de Verre mosaic, limestone & glass
two views - normal lighting and backlit
 Along with a old favorite
Tales from the River, 3.5": x 3.5 x 8.5, glass on driftwood

I have two additional shows coming up. One in April at the Page Performance Center, and a show with one other artist at LaChica in June. So I'm working in the studio every evening.

The Highest Good Is Like Water, 12" x 12", glass & marble.
I'm hoping to have at least 12 pieces for the April show and 15 for the June show.

09 November 2011

The Dalles Arrived!

After several calls to Kokomo Glass, I finally managed to get some dalle de verre ordered -- probably way too much dalle de verre for my budget, but what the hell...

They came today. Lots of blues & greens, some nice blue-greens, a couple amber-browns, a yellow, a blue-streaked clear, two nice purples and a deep red circle dalle.


A photographer for the newspaper came by tonight to take some photos for a story about me that will be in the paper soon. He wanted action shots, so I cut some marble, some smalti and some of the dalles up.


I had a pretty good mixture of cut glass (smalti & dalles) that I thought I would mix a bit of blue thinset and did some work on the river piece so that he could photograph that too.

Normally I'd have cut a lot more glass before starting this, but it seemed like a good idea for the photographer to get some photos of this part of the work too.

Now that I've got the glass I needed I can work  on this mosaic in earnest.

17 October 2011

The River Mosaic

After going through all the stone I have in the studio I've picked out what I'm going to use for the next mosaic - Emperador Medium (of course when it's cut up into tiny cubes it won't look anything like that photo). I have a 5 sq. ft. slab of it that's 1.25" thick. I just need to cut a BUNCH of it up into 3-5mm cubes... Good thing I have some big hammers.

I know what glass I'm using. Dalle de Verre - in Blues & Greens. Tomorrow I'm ordering 4 or 5 slabs (and a Blenko hammer).

I'm thinking about also incorporating some stones from the river. Don't know for sure, though - I don't want to put too much in... Sometimes I cross the line between making something really interesting and going too far with the interesting bit...

I do have some absolutely perfect river stones though - lots of them, in fact.I wonder if I have any brown ones that would look good with the Emperador Medium...

If not, I could get enthusiastic about doing some beach combing. Haven't been to Hoc-Si-La Park in quite a while...

04 July 2011

Experimenting with Dalle de Verre

Okay. I procrastinate about some things... dishes, yard work, basement cleaning, vacuuming, bill paying, all those have been known to fall by the wayside if something else that is more interesting comes along... and for me almost anything is more interesting than those things.

But I have to say that wedding gifts are by far the thing I procrastinate over the most. But for an upcoming wedding (in two weeks) I thought I would get the gift out of the way before the last minute.

I decided to make a small dalle de verre mosaic using the scraps of left over glass that I took home to finish the mosaic I started during Verdiano's workshop at the Chicago Mosaic School.

It would not be a very big piece since I had relatively few scraps that would work for dalle de verre -- since I had chosen scraps for cutting the glass into shards and tessarae for the mosaic, not for dalle de verre work. Plus I assumed I would end up wrecking some of the pieces when distressing them because I was using a regular glass hammer instead of the Blenko hammer. So I planned accordingly...

In Sophie's workshop we talked about the fact that one side would always have the substrate and the glass flush with each other since we were gluing the glass to the plastic and then adding the cement. I hate being told that something "has" to be only one way... so I started thinking of other ways to do it. Then Kim mentioned putting clay on the top surface of the glass before adding the cement might help keep the cement off of the glass and make the clean up easier...

On the drive home from Chicago I was processing the workshop in my head and I started thinking that if instead of gluing the glass to the plastic, what if I put down a slab of clay and imbedded the glass in it... wouldn't that allow me to make the piece have glass that extended beyond the substrate on both sides? I needed to experiment and the wedding gift would be the perfect test...

We'd had problems getting the plastic flat enough in the workshop... it had creases in it where the manufacturer had folded it up prior to rolling it up, and those creases were impossible to flatten out. We ended up with ridges in the backs of our pieces. So I thought I would use contact paper as a working surface. It stuck to the plywood much better than the duct tape we used to tape down the plastic. Cool, I thought (important - remember this fact...).

So here's the clay form for the piece, with hanging wire installed and a clay slab ready for glass to be pressed into it.


Here it is with the glass pressed down into the slab.

I tried Kim's suggestion -- coating the top of the glass with a clay slurry to keep the cement off of the glass.

Ready for the cement.


At one point during the workshop Karen had pondered whether or not using concrete instead of the Kerabond/Keralastic mixture would work. Would it be stronger? We did not experience any substrate failures during the workshop, but some of the pieces were thin enough that Sophie had the students adding more cement... that got us to talking about strength and size...

So for this one I used Sherri Warner Hunter's concrete recipe... except it was too thick to pipe into the piece so I had to add more of the latex plasticizer additive than her recipe called for so that it would flow though a pastry bag... (important - remember this fact, too). I also colored the concrete blue using Tints All...

After filling the piece half way I added reinforcement wire. I did not add mesh since the spaces were so small... (another important fact to be remembered).


I added more cement.

And covered it with plastic to cure overnight...


All went well when I peeled the clay off the sides. The concrete seemed very hard, but still workable. When I tried to lift the piece off of the clay slab I ran into trouble...The clay and the concrete really liked each other and refused to come apart... since I covered the plywood with contact paper which was firmly stuck down I couldn't cut it loose from the plywood either... I decided to pull the contact paper off of the plywood and then peel it  -- and the clay -- off the back of the piece.

Didn't work all that well...

Was it because I used concrete instead of cement? Was it the Tints All and/or the extra plasticizer that I added to the concrete? Was it the fact that I only added wire for the reinforcement instead of wire and mesh? Would this have been avoided if I had worked on plastic (which I could have cut loose from the plywood and peeled off the back)? Or was the entire clay slab idea the problem and doomed to fail?

Round 2

Determined to make this work I crumbled the concrete away from the glass (which the ease in doing this makes me think I screwed the concrete up) and gave the glass pieces a vinegar bath. Ditto with the hanging wire.

I remade the form, with the clay slab, but this time I put it on plastic that had been stapled to the plywood... just in case. I inserted the hanging wire and imbedded the glass.

On a couple pieces of the glass I added clay boosters so that the glass would all be the same height on the front side. Since I was working with scraps I was pretty limited with the pieces I had. I thought that the boosters would make some of the glass inset and some extended on the back side -- maybe -- worth trying in any case.

This time I added both mesh and wire... I know, I know, I'm changing too many variables to make this a good experiment, but I really wanted this to work this time.

Once again I wrapped it in plastic and set it to cure overnight.

This time the experiment was successful -- mostly... I think I would not use the boosters again -- and I would not need to anyway if I wasn't using scraps of glass -- but for this project I think I can live with it. If I do use them again I will be more deliberative about how I construct them.

As you can see in these three images, the piece stayed together (in part because I made the clay slab thick enough that I could use a pot cutting wire to lift the piece up off the board)and the glass does extend beyond the substrate on both sides giving me a nice front and back to mosaic
 Front

 Back

Side

I wrapped the piece up to let it cure for a few more days. Then I'll do a more thorough cleaning and mosaic it.  I have a lovely blue-gray marble and a gray-white travertine...

03 July 2011

Sophie Drouin - Dalle de Verre Workshop

This is a bit late, but I wanted to post some photos and write about the 5-day Dalle de Verre (slab glass) workshop that Sophie led at the Chicago Mosaic School earlier this month.

The process started with a couple days of designing our mosaics and cutting the glass. We were planning to use both the dalle de verre and stone together in the pieces. I decided to make two smaller pieces -- one to give to Eileen and one to take home with me.

I had a circular, clear piece of glass that I found somewhere that I thought I'd use in the piece I was taking home with me. I could either cut it up or use it whole and at the beginning I wasn't sure which I wanted to do. I also wanted to make the one for Eileen an expression of faith... but those were the only ideas I had going into the project.

For me the creative process starts with an idea... I never lock myself down with the ideas, I let the work evolve if it needs to. I usually start out with an idea and part of the way into it it will metamorphize into something else... for the most part this has been a good thing. I don't usually wait for a fully-formed idea before I start working on something.

The first day we had mostly greens and purples and blues to work with. We were waiting on a shipment of glass that had reds, yellows, oranges, aquas, and more greens and purples. I decided that I liked the greens and purples that we had on hand and would make my pieces with those colors.

When you cut the glass with the hammer and hardie (and when you distress it with the Blenko hammer) you have to be really careful or you will slice yourself badly... we had to have gloves for the first two days and we could not wear open-toed shoes.

Day one was spent with the design and glass. On day two -- after we had our design ideas and some of the dalle de verre cut up and ready -- we taped clear plastic down  on a 2' x 3' piece of 1/2" plywood to make our working areas. I taped my drawings down first and then covered them with the heavy  plastic.

We glued the glass to the plastic using Weldbond. Then we build a clay "dam" around the glass. This clay dam controlled the shape of the piece. We also fashioned hanging hardware from heavy galvanized wire and suspended it in the clay at a level that would be centered in the piece.

My two pieces - glass glued down, clay dam built, hanging hardware inserted.

Once this was done we mixed up some Kerabond/Keralastic and filled the piece about halfway up the glass. We added reinforcement (fiberglass mesh and galvanized wire), and added more of the Kerabond/Keralastic.We then covered the entire work with plastic to cure overnight.

 
Kim's piece with the beginning of the clay dam.
Kim used a copper tube instead of the galvanized wire for the hanging hardware.

Kim working on her clay dam.

Here are more of the work being done... I cannot remember who most of these belong to...


This one is Eugenia's - this I know because we were next to each other in the studio...


On the third day we took the clay dams off and cleaned the pieces up. Some of the pieces were not very thick and Sophie was concerned that they might not be thick enough to support their own weight. Those had to be reinforced with additional Kerabond/Keralastic -- which actually made for an interesting affect on the back of the pieces. Since my pieces were smaller and pretty thick they ended up being thick enough so I could go on to the next step -- cleaning...

I had been really careful to keep the Kerabond/Keralastic off of my glass when I was adding it. Even so I had a good amount of clean-up to do. While we were all cleaning, Kim asked if a layer of clay could have been added to the top of the glass before adding the Kerabond/Keralastic to keep the mortar off of the glass. Sophie thought that might be a good thing to try in the future.

After the clean-up I decided to add a layer of colored cement to the surface. I had been cutting  up marble as I had time and I had a nice mixture of gold, off-white and a dusty brown marble. I decided to see if I could match the dusty-brown color (with Sophie's help).

Painting on the colored layer on the piece for Eileen.

After adding the colored layer there was more clean-up to do. Eventually I was ready to mosaic the front of the piece. I was concentrating on the piece I wanted to give to Eileen, since it was going to have to be ready on Saturday so I could give it to her that night.

After talking with Sophie I decided to mimic the shape of the purple pieces of glass while following the line created with the green glass. Sophie helped me cut one large piece of stone and distress it (that's the hard part) to fit in between the two smaller pieces of purple glass.


After finishing the stone work Sophie suggested scratching the surface and exposing some of the white layer below... I wasn't sure, but decided to follow her lead. After I did it I think it really made the piece exceptional.

I haven't scratched the second one yet... I'm still thinking about whether or not it will add to the piece.

I might see if I could create a gold wash to paint into the scratches... then I would more seriously consider scratching this one up. I think white scratches might be a bit of a disconnect for this piece but gold might be very good for it.

These pieces are meant to hang in a window or other area where the the light source is from the back some of the time and from the front some of the time. I don't have a photo of Eileen's piece hanging in a window yet. But here's mine:

It's titled Ab Ovo (From the Beginning)

And, to wrap this up, here are some additional photos of everyone working on their mosaics: