Showing posts with label Stone. Show all posts

08 March 2013

Moonstruck

This evening's progress...

I've been using the Laticrete glass tile adhesive (thinset mortar). This is the third mosaic I've done with it. When my free sample runs out I'll definitely be purchasing some of it. For this mosaic I colored it with Gamblin Mars Black dry pigment - it took quite a bit of the pigment but I ended up with a rich black mortar... exactly what I wanted.

I'm thinking that I'll be at the SMU centennial dinner tomorrow with blackened fingers though... oh, well...

New Mosaic - Moonstruck

This morning's work.

Looking at it from both ends...


A close-up...

And a view without the distraction of my messy workbench...


06 March 2013

New Mosaic - Moonstruck

Today's progress:


New Mosaic

I've started a new mosaic today. I have a thin, white smalti pizza that I purchased from Mosaic Smalti that I've been brooding over for about a year (long incubation process for this one).

I've decided it's time to get to work on it.

Thin, white smalti pizza, approximately 9.5" x 11"
The problem I've had over the last year or so is how to best use this piece of glass in a mosaic. I've not worked with a whole pizza before.

In the past I've worked with lots of cut smalti as well as some broken pizzas. Those never seemed as precious to me as this piece of glass. By precious I don't mean near-and-dear-to-my-heart, but something else that I cannot quite define - maybe something in need of exacting care... I don't know... that's not exactly what I mean either. 

The Year That Was, stone & glass mosaic
using fairly large, broken pieces of smalti pizzas.
I wanted to combine the white glass with other interesting materials. I had around a pound of gold smalti that I picked up from Tiny Pieces last September when I was in Chicago for a couple days. I've always wanted to use gold smalti (but it also seemed a bit precious for where I was at with my practice). 

I decided that the gold smalti would look good with the white. 

This combination seemed to work in my mind, but I felt like it needed something to oppose the preciousness of it all. Something that would supply some sort of contrast.

As I was rummaging through the other materials in my studio I gravitated to the shelves that hold all my rocks instead of the glass supply shelves. I found the coal that I had gathered from a industrial site last year and decided that that would be the third material for this mosaic.  


Materials selected, I decided to do some planning rather than just jump in and break/cut up the white smalti pizza. First I traced it on heavy paper and made several cut-out models of the pizza. I then cut the paper models up in varying ways that I wanted to test out before actually cutting it up.

A few of the paper models
Over the course of a few days I tried several placements of the pieces and I finally came up with an arrangement that I thought worked best for the idea that was starting to come into focus in my head.

I outlined the pieces on a large sketchpad and began experimenting with how the materials might work together.
Planning the mosaic, paper (17" x 14" pad), gold smalti & coal.
I like the contrast - not only contrast of color, but the contrast of shiny/dull finishes, of smooth/rough texture, and - perhaps most of all - the contrast of luxuriousness/baseness.

So, now I'm ready to cut up the smalti pizza and get started. I also want to cut the gold smalti to 1/4 its current size so that the veins of it will be more delicate than they are in my planning diagram.

For now, the working title for this piece is Moonstruck.

13 December 2012

Aggies

Real aggies...


A gift from a co-worker... to use in mosaics.

Happy day!

28 August 2012

The Long Year - nearly finished

The stone & glass mosaic is done all except for whatever I do to frame/finish the edges.

The Long Year, 11" x 17", stone & glass

Under the pezzami
Tiko, the studio cat who oversees all my work (and uses the workbench legs as a scratching post...)


15 August 2012

The Long Year

A quick update: here's what it looks like as of tonight...

This photo is a bit orange-y, but I wanted to finish up tonight without color correcting.

06 February 2012

Mosaic Process - Working With Stone

I've had a few people ask about my process for working with stone in mosaics recently.

Creating a mosaic with stone differs from other mosaic work mostly in the way that you cut the tesserae.

How I do it:

Disclaimer - I am not an expert, yet. I'm just telling you what works for me.

Most of the stone I use starts out as floor tiles. They run from 7/16" to 5/8" thick and are usually 12" x 12" in size. Sometimes I'll get the smaller ones, but there is more waste per piece with them since I trim off all the outer smooth-cut edges.

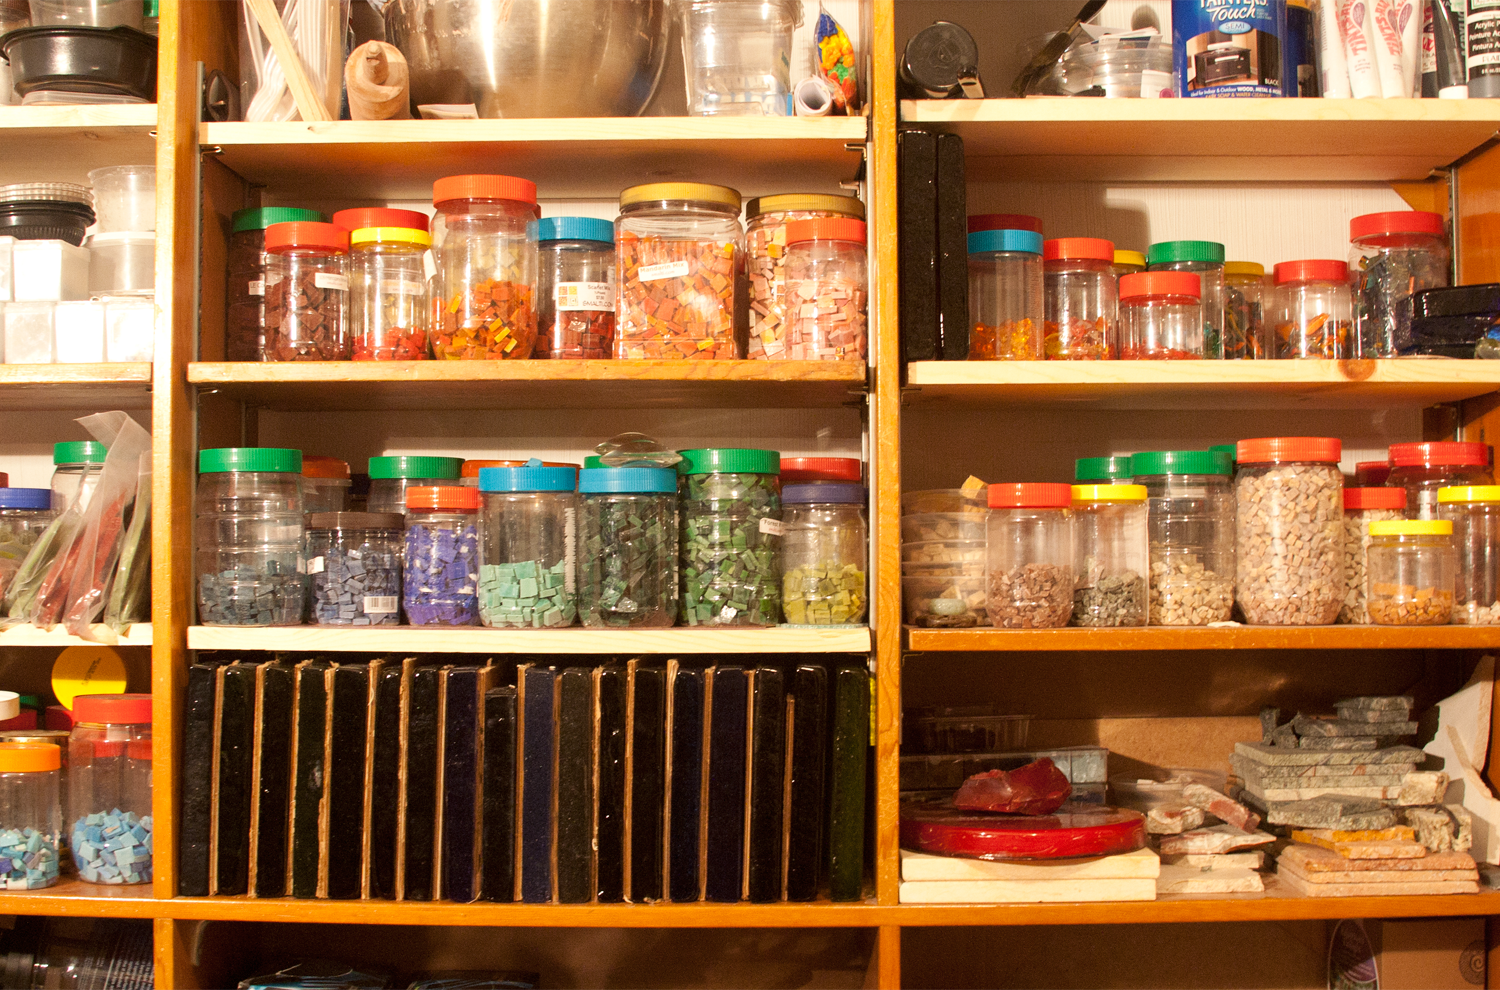
Top to bottom: 3 shelves of cut stone tesserae,
uncut stone tiles & slabs, bins of cut-up chunks

I cut the tile into manageable chunks - trying to get the chunks as rectangular as possible - with a hammer and hardie. I don't like manufactured edges to show in my mosaics, so I cut the stone to the point where the tessera has the "footprint" that I want and then I turn it sideways and cut it in half. This allows me to turn all the manufactured edges down and have only the hand-cut, irregular edges showing.

Hammers & Hardies, left - steel hammer & hardie for cutting stone,
right - carbide-tipped hamnmers and hardie for cutting glass
Stone cutting process - note the progressively smaller cuts. The two
small pieces on the top of the stack are ready for use in a mosaic.

You want to develop enough control that the force of the hammer-fall is transmitted just to the stone. There are two methods of swinging the hammer: to pivot at the elbow joint, or to pivot at the wrist. I try to isolate the pivot in my elbow joint. I find that it saves my wrist from the shock (important since I have some joint issues from earlier injuries). It also feels like I have more control and I don't fatigue so quickly.

When you're using a hammer and hardie it's important to avoid striking the hardie with the hammer as much as possible. It really dulls both the hardie and the hammer when it happens. I get the best cuts when I focus on making sure that I strike the stone exactly above where it rests on the hardie - so that the hammer tip is directly above the cutting edge of the hardie.

If I'm working with a very crumbly stone (soft limestone/sandstone) or stone that is prone to irregular cuts (heavily veined marble), I'll cut the tessarae using the hammer & hardie down to a certain size and then use my compound tile nippers or a CHEAP pair of glass tile nippers - not my Leponitts or my Montolits - to make the final cut. I have to admit that feels a bit like cheating... but I don't like wasting material and time.

I usually mix stone and glass in the mosaics. I like the rough stone and the smooth and shiny glass side-by-side. I also like the contrast between the subtle, muted colors of the stone and the more intense, pure colors of the glass.

Dalle de verre and found glass


The glass is usually dalle de verre with some smalti and the occasional weird found glass.  The dalle de verre is cut using carbide-tipped hammer and the hardie. I also use a chipping hammer to distress the surface of any larger blocks of glass and also to create shards to use in the mosaics.

Carbide-tipped hammers and hardie. Top: chipping hammer. Bottom: cutting hammer
Cutting dalles.
The carbide tips are more brittle than the steel surrounding them. It is important to always strike the glass with the hammer lined up straight with the hardie just in case you pass all the way through the glass and strike the hardie.

This is what happens when your carbide hammer strikes the hardie unevenly.
The chipping hammer isn't used with the hardie. The cut piece of dalle de verre is laid on its side and you strike it with the hammer at an angle, trying to catch just the edge of the piece of glass. This process takes off the manufactured, flat surface and creates a more visually interesting piece of glass.

The top of the smaller piece of dalle de verre has been distressed using the chipping hammer.

I use mostly Wediboard for substrate. For the stone mosaics I use the 5/8" instead of the 1/2", mainly because of the finished weight. I have a local (well, within 150 miles) supplier for the wediboard, Cole Papers in Minneapolis. They don't list wediboard on their website, but they do sell it.

I use thinset mortar to adhere the stone and glass to the Wediboard. I've been using Mapei Keraset mortar, mixed with a 1:1 mixture of water and Mapei Keraply. I'd use Laticrete products, but I can purchase the Mapei products locally.

I color the mortar with Gamblin dry pigments or Sheffield Tints-All. Lately I've been mostly using the Gamblin but I stay away from the cadmium, chromium and cobalt pigments. I don't have a safe ventilation system for using them.


05 February 2012

Desert Mosaic Update

I've finished the desert mosaic.

Desert One, 11" x 17", Marble, Limestone, Sandstone, Glass

I still need to frame it. I usually do a very minimalistic frame, usually a small strip of oak that I paint with satin black acrylic.

Photo Inspiration

03 February 2012

Desert Mosaic Update

Spent the last few nights working on the desert mosaic. I think I will get it finished tomorrow.

At 14 hours
At 18 hours
At 22 hours
I tipped it upright for this last photo so that the texture was more apparent. This is mostly marble, with some onyx, limestone, sandstone and glass shards.

Be sure to click on the images and view them in a larger format.

22 January 2012

Desert Mosaic Progress

10 hours into it:


This has been a productive weekend - in the studio and out (the only thing I should have done that I didn't was finish the laundry).

I'm cutting some more stone right now. I'm getting faster at working with the hammer & hardie. I need to time cutting a 12" tile so that I can accurately account for the labor that goes into a mosaic.

21 January 2012

Desert Mosaic Update

I've started laying in the tesserae on the first desert mosaic. It seems to be coming together well. My only worry is that I will need more variety of desert-colored stone. If there wasn't several inches of snow on the ground I'd go beach combing or climb up sugarloaf and gather some stone.

When I was cutting up some of the stone I had on hand I found one tile that was a deep rusty orange. It was only a 6 inch tile, but I got as much usable stone out of it that I could. I used almost half of it to do the large swath that you can see in the photo.


I may end up visiting some of the tile stores around here to see if I can find more desert colors.

18 January 2012

Desert Mosaics

It seems that much of my art work is inspired by place these days - place, or the environment, the world around us.

Tonight I started working on a set of desert-inspired mosaics. I've done a good number of pieces that are about water and these next two or three will be about the lack of water. I spent a lot of our hike in the Mojave a couple weeks ago thinking about how I would represent a desert in a mosaic- not the Mojave, per se, but the idea of a desert...

Tonight's work was mostly selecting and cutting stone - sandstone, marble, slate and onyx (tans, browns, oranges, reds and grays) - and choosing glass (reds, oranges, blues, grays and black) that will blend well with the stone I have selected.


The small piles are individual sandstone rocks that I picked up in the Mojave. A couple of the rocks have a really cool layered coloring - I think it's from baking in the relentless sun out there. The outer surface of the rocks have a patina-like coloring that is very different from the inner parts.

15 January 2012

Catching up

A few images of recent mosaics.

These two new mosaics are going to be in a multi-artist show at LaChica Art & Music in Las Vegas in February. The show theme is nature-inspired abstracts.

Red River, 12" x 12", glass, marble, slate, coal

Inkling – the Seed of an Idea, 8" x 17", Dalle de Verre mosaic, limestone & glass
two views - normal lighting and backlit
 Along with a old favorite
Tales from the River, 3.5": x 3.5 x 8.5, glass on driftwood

I have two additional shows coming up. One in April at the Page Performance Center, and a show with one other artist at LaChica in June. So I'm working in the studio every evening.

The Highest Good Is Like Water, 12" x 12", glass & marble.
I'm hoping to have at least 12 pieces for the April show and 15 for the June show.

09 November 2011

The Dalles Arrived!

After several calls to Kokomo Glass, I finally managed to get some dalle de verre ordered -- probably way too much dalle de verre for my budget, but what the hell...

They came today. Lots of blues & greens, some nice blue-greens, a couple amber-browns, a yellow, a blue-streaked clear, two nice purples and a deep red circle dalle.


A photographer for the newspaper came by tonight to take some photos for a story about me that will be in the paper soon. He wanted action shots, so I cut some marble, some smalti and some of the dalles up.


I had a pretty good mixture of cut glass (smalti & dalles) that I thought I would mix a bit of blue thinset and did some work on the river piece so that he could photograph that too.

Normally I'd have cut a lot more glass before starting this, but it seemed like a good idea for the photographer to get some photos of this part of the work too.

Now that I've got the glass I needed I can work  on this mosaic in earnest.

05 September 2011

Mosaic Doodles

Did some mosaic doodling... quick, small mosaics. Exploring ideas...

Onyx, Smalti & Marble                                   Onyx & Marble

28 July 2011

Mosaic Art

While I wait for the payment for the commission (which should arrive in my bank account sometime in the next 24 hours) I'm thinking of ideas for the next mosaic(s). At this point, unless I get another commission soon I will be doing a couple different pieces for myself - just because...

One of them is going to have to be a river/water/place piece... that's what's pressing right now; that's what seems to be spinning around in my head. I think it will be another stone & glass piece...

In the meanwhile, I'm cutting up marble - for fun and practice and for future work - I can work on my hammer and hardie skills while my mind thinks about what's next.

This is what I cut in about 20 minutes tonight:

 
I'm getting better at this... better cuts (shapes and sizes that I want to make, as opposed to however they come out), and much, much less waste.

And here's the scraps:


That's all that I wasted.